Wedding Venues: Decorating a Village Hall
Lindsey Hunter of Get Knotted has some fantastic tips on how to decorate a village hall, and we just had to share them.
If you're interested in how Lindsey made the beautiful greenery table garlands, then you'll find her how-to guide at the bottom of this post.
Decorating a Village Hall
Deciding how to decorate your venue is an exciting yet daunting prospect. Different types of venues will require different decorations. If you are having your reception at a manor house, you could add details to complement the existing décor, whereas you have a blank canvas when it comes to decorating a marquee or barn, but how do you decorate a village hall?
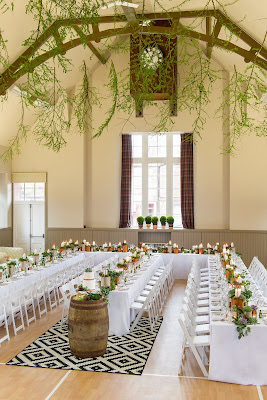
Village halls are perfect for holding your wedding reception; they tend to be very spacious with high ceilings, which are great for adding details to. However, with all that space, it can be difficult to envisage how you want it to look. Lindsey Hunter has recently decorated and styled a wedding at St Boswells village hall in the Scottish Borders and shares what she did:
Entrance: The entrance hall was spruced up with the addition of a large rug, a rustic console and painted chairs to give a taster of what guests were about to see inside.
Further homely touches such as lanterns and candles were also added to create a warm welcome.
Ceiling: To add some warmth and colour to the large space, fresh branches were tied to the beams on the ceiling to create a pretty green canopy.
Tables: Extra wide trestle tables were used to allow for the table groupings and garlands. White, floor length linen tablecloths were placed on the tables for a crisp white background on which to display the garlands and groupings. Garlands of greenery, which included ivy and eucalyptus, were placed on the tables with gold and copper tin cans. Different sized candles and succulents were then used to add some extra detail to the garlands.
Floor: Most village halls have a wooden floor. To add some contrast to the wood, a large black and white rug was placed at one end of the middle line of tables. Teamed with an old barrel, which made a perfect stand for the wedding cake, this really suited the wedding theme and setting perfectly.
Seating: White folding chairs were used for guests to sit on at the tables. These were chosen to match the crisp tablecloths and to ensure the table décor stood out. To the side of the room, ivory inflatable furniture and coffee tables were added to create a chill out area for guests to use.
Lighting: Festoon lighting was strung informally over the village hall’s stage teamed with some topiary balls to the front. The topiary ball pots were painted gold and copper to match the table decorations.
Bar: A rustic bar section was created using old metal with added industrial shelving and some old wooden crates. Large BAR letters were placed at the back of the bar to complement the on-trend look. To continue the rustic industrial feel, galvanised pails were filled with ice and drinks for guests to help themselves.
Styling a venue such as a village hall is fun, as you can really get creative with the details you add. However, it requires a lot of hard work, materials and manpower. If styling isn’t your forte, Lindsey is a professional wedding planner and venue stylist.
For more information about Lindsey and for some more inspiration, visit www.get-knotted.net
How to make a greenery table garland
DIY weddings are all the rage at the moment, especially as there are so many tutorials and guides for you to learn from. Adding details you have made yourself will not only save you money, it is also a great way to integrate your own personalities and style.
Many think DIY wedding details are just for creative and arty types. Lindsey Hunter of Get Knotted has put together a how-to on making a simple and elegant greenery table garland decoration that everyone can make.
What you will need:
• A collection of paint cans • Spray paint in the colours of your choice • Succulents in different sizes and shapes • Your choice of greenery: moss, ivy and eucalyptus • Mixture of candles
Method:
1. Spray paint cans in the colours of your choice. It’s nice to use a few contrasting colours to suit your wedding theme.
2. Create a garland that curves to the length of the table using the different varieties of greenery. TIP – choose varieties that won’t wilt too quickly; you will want them to last the whole day.
3. Place succulents and moss around the top edges of the paint cans leaving room to place a candle or two.
4. Place paint cans randomly or symmetrically along your garland.
5. Add different sized candles to the tops of a few of the paint cans.
6. Add some moss to cover any of the paint can tops that might be showing.
7. Place some smaller tea lights in between the cans and at the front of your garland.
8. Add some succulents to the garland to complete the look. TIP: ask the venue to light the candles before you and your guests enter the room.
Even if you’re not the creative type, a simple garland like this is easy to make and when you look at it on your big day, you will feel proud to see details you have made yourself. Why not make DIY projects even more fun by getting together with members of your bridal party and friends and see what else you can make.
If you would still like some help when it comes to styling and adding details, Lindsey is a professional wedding planner and venue stylist.
For more information about Lindsey and for some more inspiration, visit www.get-knotted.co.uk


